Help Trolling Motor Nightmare

Classic Parker Boat Forum

Help Support Classic Parker Boat Forum:

This site may earn a commission from merchant affiliate links, including eBay, Amazon, and others.
Started boating a few years ago, My whole family has gotten into it, but we got tired of the pounding of our Montauk. I made the decision to buy a new 2021 21se, I opted to get a trolling motor, I boat in a rocky area and take family members that don’t fish bottom fishing snd the spot lock makes it nice. I went with a minn kota 112lb 36v 72 inch motor and a shuttle slide SS-9-HD mount.

I went to a minn kota dealer and didn’t think I was going to get screwed around. First they mounted tbe motor down the middle of tbe bow. Then they kept insisting it was right. Finally I sent the boat back and they moved the mount.

I was out yesterday bottom fishing in a little bit of a chop. I noticed a little bit of play in my motor on the bracket I then noticed the bracket was kind of seperated from the cap of the boat.

I took the first picture and the shuttle mount needs 6 bolts they use 4 bolts with fender washers and then screws. The screws are now popped out in tbe gront

What are my options here? Can I maybe use a toggle bolt, the access to the back of the deck is what is tough here. What about if maybe I take the fender washer and crazy glue it to the nut, this will make it so I don’t have to hold the washer, then try to reach in wirh an extender and tighten the bolt. Honestly I am nervous about more of the install as well from seeing this amateu

Can I run the boat like this and just not use the trolling motor? The Striper bite has been hit

I have the Parker gel coat for the deck to fix the holes

first pic-install down the middle of the bow
Second pic- way I wanted it
Third pic, view of bolts and screws

i am not that handy as well so trying to learn as I go. Willing to pay a shop to fix it. I am in Connecticut.
The MinnKota Dealer installer was obviously a hack to mount it that way to begin with.
They should have been responsible for doing repairs to make the boat the way they found it before that install.
 
The MinnKota Dealer installer was obviously a hack to mount it that way to begin with.
They should have been responsible for doing repairs to make the boat the way they found it before that install.
They refunded me for the whole install…..new shop mounted the plate and fixed the fiber glass
 
I wish this were the end to this drama lol it seems to never end with this.

My marina implemented a no extension cord policy so decided to upgrade to a lithium that is 1 36v and is the size of 1 lead acid battery.

In order to do this I had to removed and reposition my battery box.

none of the holes drilled for the battery box were sealer with marine sealant. Some of them were weeping water.

I had loctite marine epoxy on me so was going to fill them up with a syringe but the epoxy was hardened up in in the packaging.

there is a west marine down the street, I bedded the holes with the new screws with ancortech marine sealant.

do you think I should clean the holes out from the sealant and redrill and put epoxy for the screw holes without screws from the old battery box position?

it’s frustrating that a shop would not seal screws with sealant that’s marine basics 101IMG_0006.jpeg
 
I wish this were the end to this drama lol it seems to never end with this.

My marina implemented a no extension cord policy so decided to upgrade to a lithium that is 1 36v and is the size of 1 lead acid battery.

In order to do this I had to removed and reposition my battery box.

none of the holes drilled for the battery box were sealer with marine sealant. Some of them were weeping water.

I had loctite marine epoxy on me so was going to fill them up with a syringe but the epoxy was hardened up in in the packaging.

there is a west marine down the street, I bedded the holes with the new screws with ancortech marine sealant.

do you think I should clean the holes out from the sealant and redrill and put epoxy for the screw holes without screws from the old battery box position?

it’s frustrating that a shop would not seal screws with sealant that’s marine basics 101View attachment 39971
As far as the old holes go, there’s not much you’ll be able to do until they dry out. I’d try to let them dry, then short-term seal them with sealant to prevent further water intrusion.

For the new holes, your sealant job with AnchorTech is sufficient.

If it were me, I’d put both on the “long term” project list to remove the sealant/fasteners, over-drill the holes, fill with epoxy and then mount the fasteners in epoxy. But that’s off season work. Sealant will get you going for now, which I suspect is what you’re looking to do.

Another question: looks like this is inside the console; how did the original holes get wet? That should be a pretty dry area. Are the fasteners going through the console and into the deck beneath, and getting wet from water running beneath the console?

Lastly, what’s the deal with the “no extension cords” policy??? How do they expect people to run shore power? You’re still going to need to charge that new battery, just not as frequently. Seems like there needs to be a bit more guidance on this one.
Good question. I have no clue how they get water in there. I just know when I took the screws out there was no sealant on them and weeped a good deal of water. You are right that is in my console. The screws are an inch and a half thick so not super penetrating. Maybe that is where the bilge tunnel is and the screws penetrating an always wet area?

I already sealed all the holes with anchor tech. Game plan was going to be when the epoxy comes in I ordered to drill out all the old holes and use Loctite marine epoxy which is suppose to be able to set in water. Are you now saying I should have let all the holes dry out before I sealed with sealant temporarily? The boat sits slipped so wanted to prevent any further water intrusion so I temporarily sealed them even though they were not dried out.

My game plan was to take home the battery to charge which is why I have the quick disconnect hooked up to my battery. We don’t have boats with shore power in my marina the max size a boat can be is 23 feet.

Thank you for your response
 
That type battery tray and the plastic strap.

Put your hand on the battery...Now try and shake the piss out of it. It moved in the tray , didn't it?
They all do with those and why I take them out and throw them away. You don't see it when your running the boat, but your batteries are getting beat to Crap..... Bad for batteries.
It’s fits better on the new battery I did try to move the battery and no play. New battery is only 34lb those old lead acids 55lb a piece

What do you recommend I do with the screw holes? I used Pettit fast dry in the red tube and masking tape over it to hold it in.

My new screws holding the battery box down I used heavy sealant on the screws and the holes. If there is water still weeping you think no good?

You think the water is just from all those holes not being sealed?

Sorry for all the questions just want to get it right
 
So much for measure twice cut once !..At least sit back with 1/2 dozen beers , , on boat and evaluate how to approach this !! Sometimes best directions are on the back of that beer can !!.. lol Glad you have it worked out !..nice install wart good job as always !..
 
That type battery tray and the plastic strap.

Put your hand on the battery...Now try and shake the piss out of it. It moved in the tray , didn't it?
They all do with those and why I take them out and throw them away. You don't see it when you’re running the boat, but your batteries are getting beat to Crap..... Bad for batteries.
You have a battery tray you would recommend? I am all for making it best in practice.

I went to the boat today and countersink all the screw holes and laid in loctite marine epoxy with packing tape over to get it flat. For the holes for the existing battery box I bedded screws in 4200.
 
For the "Standard" Gp24 & Gp27's, I only use The Attwood model like this.

att-9090-5_lg__28832.1558143452.jpg


attwood-battery-holder-large-1118234-1.jpg


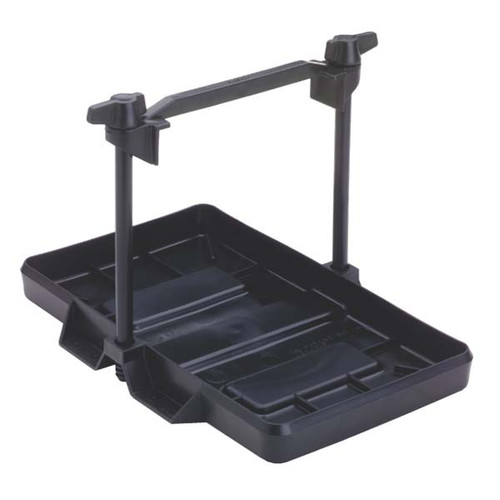
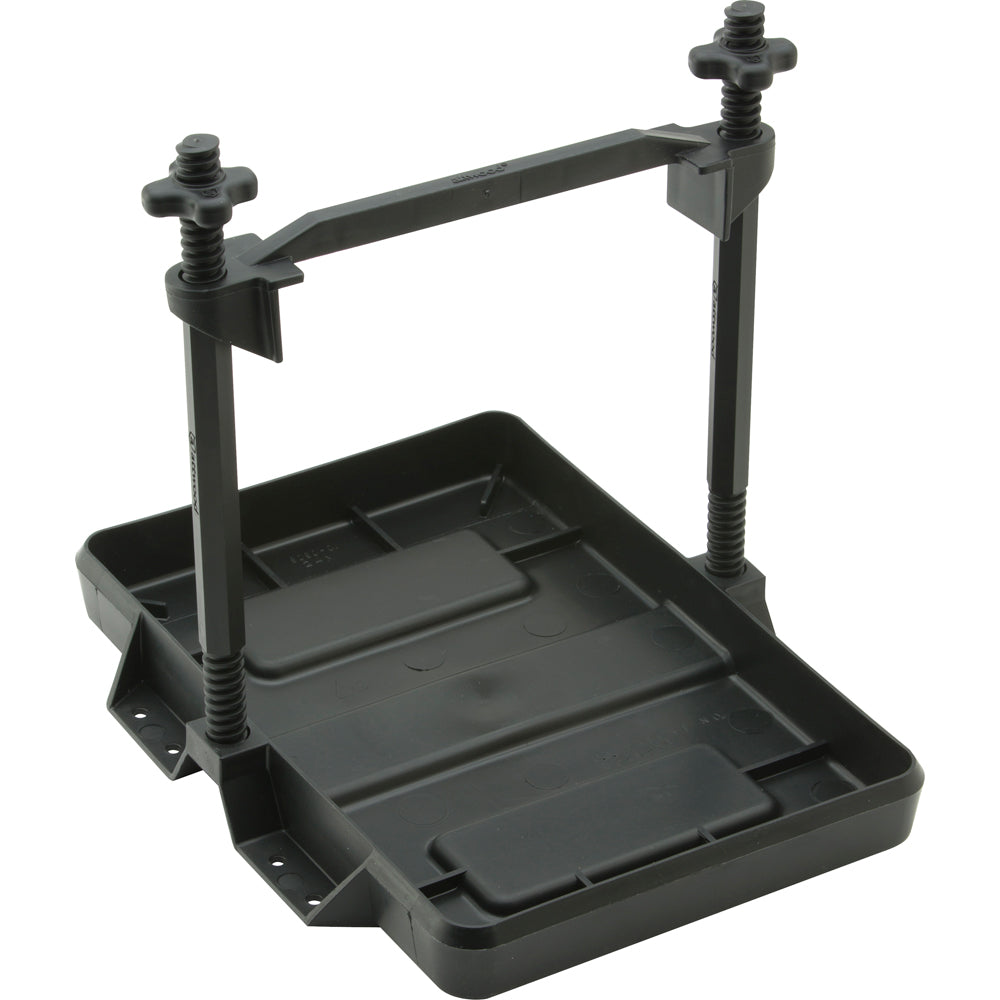
Not to be confused with THIS one.

59935XL_2000x.jpg


For odd sizes [Read Lithem 24 & 36V] I build custom Starboard trays. They have a 2in Starboard surround around the battery. It has recessed T nuts and thread-All installed into the T nuts. A jam nut is installed to lock the thread-All in. On 36V it will have 4pcs of thread-all and 2 cross bars across the top of the battery.
 

Attachments

  • 20240307_161032.jpg
    20240307_161032.jpg
    2.6 MB
Last edited:
For the "Standard" Gp24 & Gp27's, I only use The Attwood model like this.

att-9090-5_lg__28832.1558143452.jpg


attwood-battery-holder-large-1118234-1.jpg


Not to be confused with THIS one.

59935XL_2000x.jpg


For odd sizes [Read Lithem 24 & 36V] I build custom Starboard trays. They have a 2in Starboard surround around the battery. It has recessed T nuts and thread-All installed into the T nuts. A jam nut is installed to lock the thread-All in. On 36V it will have 4pcs of thread-all and 2 cross bars across the top of the battery.
My battery 36v 60ah is made to be a standard size 31. It also weights 34lb. That battery box still not good? It has 4 attachment pints to the floor with size 8 screws I bedded in 4200.

Keep in mind I also need to take the battery off and on the boat to charge so some sort of buckle would be best. My marina now won’t let extension cords at the docks.

What do you think?
 
The concern is ..... Will the battery wiggle around when strapped down?

Most of the ones with a plastic tray and a plastic buckle band they move around.

The one that GetALong posted has a ratchet strap.... That one is going to cinch them down well....and release easy also. Something that the belts / straps on some do not....The type that the tag end weaves thru the buckle a certain way.... Hate Those!

I put these things in All kinds of boats.... Regular trays would not work in... It all has to do with the space available and keeping it neat.

Sometimes I have to put 2 on the bottom, build a shelf over those and have the 3rd one on the shelf. That is typically in a center console boat , down inside the console and trying not to Hog all the small floor space in there.
 
Thank you I have ordered those battery trays that you sent, now to patch 4 more holes and redrill down the new battery box.

Anyone have any luck in using the cap on the locktite marine epoxy?
 
Ok Wart, I’ll bite… what’s the significant difference between the two?

Look Closely. The Top is a 1 piece screw bolt.

The bottom is a 2 piece.... Stud is 1 piece and knob another piece.

Why is this important? You want those Studs out of the way when installing / Removing a battery.
Most.... not all. Batteries don't just pull straight up out of a tray. They have to be manipulated sideways.

The single wing bolt [Top pix] unscrews and gets them totally out of the way.

The bottom 2 piece model you have to screw with... It's just a pain. The thumb wheel nut comes off leaving the stud in the way. Then you go get pliers to get the stud unthreaded and out of the way.

ALWAYS apply silicone grease to the threads and DO Not tighten the stem winding Crap out of the threaded studs. You can break them. I've broken 1.... But it was a defective part and had a void in the casting.

I have made the mistake and accidentally ordered the 2nd pix tray..... What a Pain.
 
Guys thank you. I got the tray from bass tech. This seems like a much sturdier product. I also like how the screw holes are under the tray which will make for a better seal with sealant…

IMG_0142.jpeg
 
All done I drilled out all the old screw holes with a countersink, laid loctite marine epoxy in them and packing tap over the top.

For the battery box, I filled the holes good with 4200 and 4200 on the screws. Got a nice tight seal.

My next step will be to take out that old charger and sell it.

Now to finally get some weather and fish. It’s been easy and northeast which is no bueno. IMG_0167.jpeg
 
Back
Top