Fly Rod
Active member
I've been meaning to add this to the Parker "user's manual" for a while. Since owners have started their spring upgrades, here's an issue that I dealt with last year.
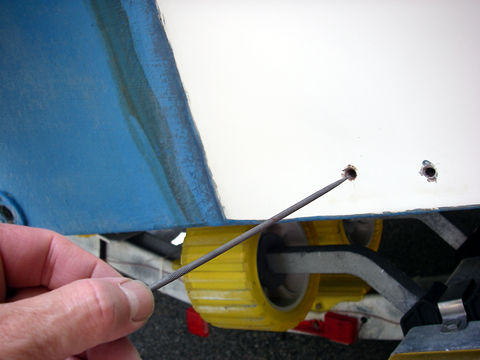
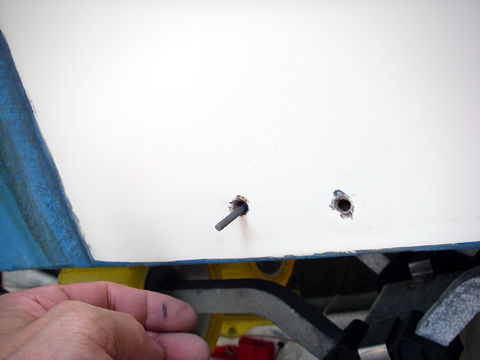
I have a 2003 1801 cc that I bought used 3 years ago. Last spring I changed the fish finder, which required removing the old transom-mounted transducer and mounting a new Airmar P60 for a Raymarine fish finder. After I unscrewed the old transducer, I probed the screw holes to see how much epoxy I would need to inject to plug it. To my astonishment, I found that the holes went all the way through to the bilge!


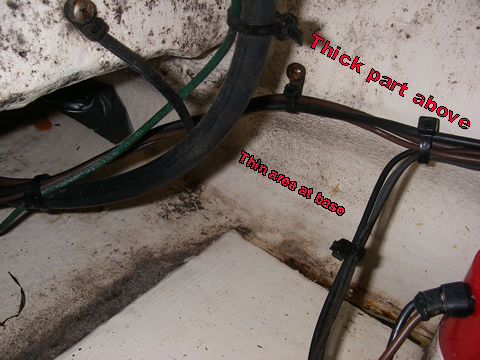
Long-story-short, while most of the transom is a couple of inches thick, there is a band at the very bottom of the transom that is only 1/2" thick. You can see this in the next image. I have the camera lowered into the bilge pointing aft. The red object on the right is the bilge pump.

I've marked the thin section at the base of the transom. Above the band the transom is much thicker. To the far left is a piece of black tape that I placed over the inside of the original screw holes as backing prior to filling with epoxy.
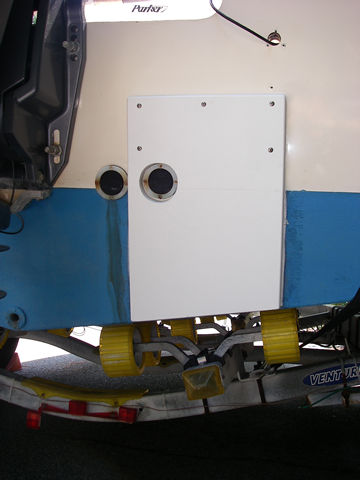
My solution was to install a transducer mounting plate (Cabelas, 12" x 18") that I shaped to fit to the contours of the hull and scupper. It is attached above the water-line with 5 stainless steel screws and the entire back of the board is glued and sealed with 3M 4200.

I'm not sure what the transom board is made of. If it's something like King Starboard, the adhesive alone isn't sufficient to hold the board. In any case, I mounted the new transducer to the board and used it all last summer with no problems.
So, the moral of the story is: be careful before you start drilling holes in your transom!
I have a 2003 1801 cc that I bought used 3 years ago. Last spring I changed the fish finder, which required removing the old transom-mounted transducer and mounting a new Airmar P60 for a Raymarine fish finder. After I unscrewed the old transducer, I probed the screw holes to see how much epoxy I would need to inject to plug it. To my astonishment, I found that the holes went all the way through to the bilge!


Long-story-short, while most of the transom is a couple of inches thick, there is a band at the very bottom of the transom that is only 1/2" thick. You can see this in the next image. I have the camera lowered into the bilge pointing aft. The red object on the right is the bilge pump.

I've marked the thin section at the base of the transom. Above the band the transom is much thicker. To the far left is a piece of black tape that I placed over the inside of the original screw holes as backing prior to filling with epoxy.
My solution was to install a transducer mounting plate (Cabelas, 12" x 18") that I shaped to fit to the contours of the hull and scupper. It is attached above the water-line with 5 stainless steel screws and the entire back of the board is glued and sealed with 3M 4200.

I'm not sure what the transom board is made of. If it's something like King Starboard, the adhesive alone isn't sufficient to hold the board. In any case, I mounted the new transducer to the board and used it all last summer with no problems.
So, the moral of the story is: be careful before you start drilling holes in your transom!


