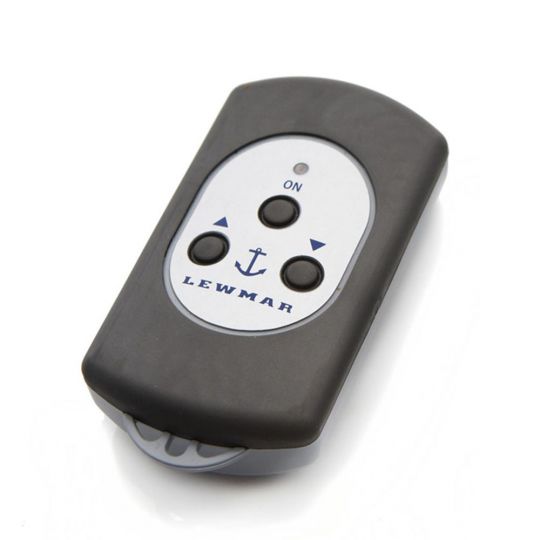
Installing Lewmar Pro Fish 700

Classic Parker Boat Forum

Help Support Classic Parker Boat Forum:

This site may earn a commission from merchant affiliate links, including eBay, Amazon, and others.
Can anyone on here recommend a good gasoline transfer pump that i can safely use to empty my tank on my 2320 the gas is about three years old and i want to off load it
thanks all Pat G
Any 12v fuel pump from the auto parts store. They run 30-50 gph so not fast, but they are cheaper than a bulk pump since this appears to be a one-time use.
 
The windlass rocker switch that activates the windlass solenoid only requires 3 amps. Basically you are putting a low amp on off switch in the line feeding the windlass rocker. Referring the the Lewmar wiring diagram you are just adding a switch after the 3 amp fuse. To accomplish this Using the dash switch panel, change the breaker to 3 amps and use the blank accessory switch that is already there. No need to run the low amp power wire from the solenoid to the windlass rocker, the rocker is now powered by the accessory switch.
Yes, I understood where you were going with it after I pondered your original reply. I didn’t think of it but I do think it would work. As mentioned, you are just tapping the hot from the rocker to the hot on the solenoid. That lead has a 3amp in line fuse so I could see that working. The main solenoid power is still from the battery with the 50amp breaker. However, on mine, the port wiper is wired to my acc switch and all others are full. Interesting concept though. I did wire my solenoid under the helm so the run was short. Thanks again for the input. Much appreciated.
 
Gotta be honest, I really think too much time is being dedicated to making the windlass switch “bump proof”.

First of all, has anyone here actually had this happen to them? I have the huge, Good-style toggle type of windlass switch and I’ve never had an issue bumping it. The flat type of switch in the picture is even less likely to get inadvertently activated.

Second, your anchor should be secured by some other means than just windlass tension. So in the event that you DO somehow bump the down switch, all it’s going to do is maybe put a little bit of slack in the rode and the anchor might shift a bit on the roller. It’s not like the anchor is going to go plummeting off the pulpit. No big deal; just bump it back up into place.

I just think this is over-engineering a solution to an issue that should already be solved by good operating practice.
 
Gotta be honest, I really think too much time is being dedicated to making the windlass switch “bump proof”.

LOL..... on 3 different installs.... I never installed a switch on the dash...It's a momentary switch..... You can't see really whats going on from the helm seat and if you have a foul.....You can't jog the windless. I wouldn't install one without it.

The answer :
LEW68001005_540x540.jpg
 
I've been a Parker dealer for over 30 years and have hundreds of Parkers in the field with windlasses that are factory installed and that we have installed.

A "safety switch" on the dash is not always necessary. But not every Parker's dash is laid out the same and in some cases, the trim tab switch is right next to the windlass switch. Where the switches may be easily confused we add the safety switch.

No one on this forum would ever make the mistake of pressing the wrong button but I have seen it and the result is not pretty.

I agree with pelagic2530, with good operating practices this should never be an issue. But I have found people, not on this forum, buy a windlass so they never have to walk up to the bow of the boat to anchor. They do not always secure it when retrieved and they do not always tie it off when it is deployed.

I agree with warthog5 and I am a big fan of the wireless remote, but not every owner sees the merit or uses the windlass in a way that needs it.

Believe it or not, even though I am a dealer, I do try to save people money.
 
LOL..... on 3 different installs.... I never installed a switch on the dash...It's a momentary switch..... You can't see really whats going on from the helm seat and if you have a foul.....You can't jog the windless. I wouldn't install one without it.

The answer :
LEW68001005_540x540.jpg
Hmm… I wonder if the Lewmar remote could be made to work with other brands. I’m guessing it’s just sending a remote signal to the solenoids, which in theory is just a +/- 12v signal.

I’d still be reluctant to install one without a hard wired switch. Imagine dropping the remote overboard walking back from the bow while anchored offshore- that’s a lot of rode to pull up by hand and coil up on the bow.

If you’re really worried about it, they make toggle switches with safety covers. Maybe one of them would fit the bill.
 
Well, I guess I started all this with my OCD and wanting to do everything as correctly as possible. That said, due to how “I” may run the boat on occasion, I may not go up to the bow to hook the safety/Anchor snubber to the chain every time, I wanted an on off switch. My rocker switch for the windless is also just above the trim tab switch, so I did want the added safety of the breaker so I could use it as on off at the helm. We have a barrier island just 10 minutes or less of planing speed on sound side from where I anchor to a creek I port from. I may not always want to go up and connect the safety. It’s a backside short run. Shame on me I know. Also, the Lewmar thermal breaker I got with the kit was a flush mount and due to the location in the jump seat I needed to mount a breaker near the battery, I wanted a surface mount to keep the breaker inside the jump seat. It’s was an extra $40. So I figured I’d use the flush at the helm for on off and a surface at the battery for proper location of a fuse. It works for me and it could be worse. I will have a snubber at the windless but I want the added safety when I don’t won’t to go on deck. I do plan to add the remote at some point which is partially why I put the solenoid under the helm for an easy tap when I did it. Maybe this is a case of do as “they” say and not as “I” do on this project. As always, I appreciate everyone’s input on this great forum.
 
Last edited:
Well, I guess I started all this with my OCD and wanting to do everything as correctly as possible. That said, due to how “I” may run the boat on occasion, I may not go up to the bow to hook the safety/Anchor snubber to the chain every time, I wanted an on off switch. My rocker switch for the windless is also just above the trim tab switch, so I did want the added safety of the breaker so I could use it as on off at the helm. We have a barrier island just 10 minutes or less of planing speed on sound side from where I anchor to a creek I port from. I may not always want to go up and connect the safety. It’s a backside short run. Shame on me I know. Also, the Lewmar thermal breaker I got with the kit was a flush mount and due to the location in the jump seat I needed to mount a breaker near the battery, I wanted a surface mount to keep the breaker inside the jump seat. It’s was an extra $40. So I figured I’d use the flush at the helm for on off and a surface at the battery for proper location of a fuse. It works for me and it could be worse. I will have a snubber at the windless but I want the added safety when I don’t won’t to go on deck. I do plan to add the remote at some point which is partially why I put the solenoid under the help for an easy tap when I did it. Maybe this is a case of do as “they” say and not as “I” do on this project. As always, I appreciate everyone’s input on this great forum.
Warthog disagrees with me on this one, but for occasional use, manually securing power to the windlass by opening the breaker at the helm is perfectly fine. The breaker is designed to have that functionality.

I wouldn’t do it 10 times a day, but closing it when you’re anchoring and then opening it once you’re done weighing anchor and getting underway won’t harm it a bit.
 
Warthog disagrees with me on this one, but for occasional use, manually securing power to the windlass by opening the breaker at the helm is perfectly fine.

It's not really a disagreement.... It's more..... I just wouldn't do it that way. :)

Loosing the Remote..... Rule * When you pick up Remote out of cradle that is at helm.... Lanyard goes around neck ! You can just leave Remote in cradle mounted at helm. If Remote sits without use for a little bit.... You have to wake it up. You wake it up by hitting ON button on remote....Lil Blue light comes ON..... Then you hit UP or DOWN...... So it's actually safer than a powered Momentary switch. :) When I wired mine on the Parker.... It had it's own Master ON/OFF switch back beside the BEP Cluster. It was wired to the START battery. I used that funky recess mounted CB that comes with it. It was mounted in a Gray PVC A/C duplex box with a Blank plate.. The Blank plate was cut for the CB.

Hope that helps?
 
Didn’t feel like starting a new thread on this but sharing with you guys anyway. I’m on the clean up stage of putting back in the water for 6 months. I have been working on the wax. Back on my big project thread from May 2017 the last thing I did was wax using ZEP Wax. That’s 5 years ago. My boat has only been sitting in a wet slip for 2 seasons with the other 3 just in and out of the barn on average 12 times a year on weekends. That said, it really needed to be redone last year but it was still holding a decent shine. One of these pics is 2017 and the other is Monday night. I never followed up with my long term thoughts on this stuff. I’m cautiously giving it a thumbs up. The re-stripping and prep is all the work. After that you just wipe on about 5 to 7 coats and let it dry. No regular wax in NC salt water environment would ever come close to lasting as long as this stuff did. Washing the boat the dirt just falls off of it and doesn’t penetrate the gel coat and stain. ZEP is an acrylic wax and it locks down the porousness in the gel coat and hangs in there for a long time. I don’t think I would do it on a new boat, but maybe. For an older hull, I say go for it. At this point, my next step may be Awegrip paint or something. Just my 2 cents.
I did put her in for a few hours on Friday for a shake down cruise to check all systems. The Windless functioned perfectly, one time anyway. The 125’ of 8 plate and the 100’ of 1/4 G4 lays nicely in the locker with plenty of room. I probably should have added more rode. I’ll take a pic of the anchor locker from the berth next time I’m out. Then others with 2120/2320 can judge for themselves what the combo uses up in the locker. I’m glad I went with a bunch of chain though. Time will tell on function and maybe I’ll update after a summer of anchoring. Wish you all the best summer season with your Parkers
 

Attachments

  • 7C0656F5-32AE-488F-8DDB-93AF00E488DD.jpeg
    7C0656F5-32AE-488F-8DDB-93AF00E488DD.jpeg
    3.2 MB
  • 4B56D551-1D70-4B63-9DD1-65F1FD05AA00.png
    4B56D551-1D70-4B63-9DD1-65F1FD05AA00.png
    8.4 MB
Last edited:
Making anchor locker bigger to hold 600ft of rode
 

Attachments

  • 100_5085.JPG
    100_5085.JPG
    143.7 KB
  • 100_5093.JPG
    100_5093.JPG
    190 KB
  • 100_5112.JPG
    100_5112.JPG
    151.9 KB
  • 100_5154.JPG
    100_5154.JPG
    111.6 KB
  • 100_5155.JPG
    100_5155.JPG
    129.5 KB
  • 100_5156.JPG
    100_5156.JPG
    121.4 KB
Mounting windless higher for more drop and so chain doesn't drag on pulpit.
 

Attachments

  • 100_5145.JPG
    100_5145.JPG
    164.3 KB
  • 100_5146.JPG
    100_5146.JPG
    177.9 KB
  • 100_5147.JPG
    100_5147.JPG
    145.6 KB
I remember looking at this project. Nice job on all that fabrication Warthog. That is the ideal placement for drop. I considered eliminating that rode hatch but I don’t have the skill level to do it and it would have likely been a hack job. Hopefully for my island anchoring it will work out. I have over 300’ from my old rode I may create an extra 150 to put behind the bench seat for offshore times I may need it. They made 4 links to my bitter end and I shackled to the locker. Would be easy to hook up
 
Yes... :) The 1st pix is the mold I built. Heres more pix's.

That bucket of sand is to weigh down the Coosa Core material.... Then more glass over that. It's a one Off mold, as I destroyed it when part was removed.
 

Attachments

  • 100_5082.JPG
    100_5082.JPG
    172.9 KB
  • 100_5093.JPG
    100_5093.JPG
    190 KB
  • 100_5092.JPG
    100_5092.JPG
    191.7 KB
  • 100_5091.JPG
    100_5091.JPG
    188 KB
  • 100_5090.JPG
    100_5090.JPG
    189.7 KB
  • 100_5086.JPG
    100_5086.JPG
    182.7 KB
  • 100_5085.JPG
    100_5085.JPG
    143.7 KB
  • 100_5084.JPG
    100_5084.JPG
    154.1 KB
  • 100_5083.JPG
    100_5083.JPG
    142.5 KB
Wow nice work to bad you destroyed the mold.I am sure you could have sold quite a few including myself.
 
Making anchor locker bigger to hold 600ft of rode
WH
I’m always interested in seeing pictures of your projects. As usual an excellent example of workmanship, innovation, and execution.
Curious; how did you determine how much space was needed? Rope isn’t a typical measurement of volume.
M
 
Curious; how did you determine how much space was needed? Rope isn’t a typical measurement of volume.

I built that so long ago....I honestly don't remember. [Built 5/8/13]

From what I can remember...... I just built it as Big as I could and the cushions still be easy to R&R. :)
 
Two things:
First a picture of my windlass remote. I stick my left foot through the open starboard window. Not very practical at 40 degrees haha, but I am hunting then anyway.

IMG_20230521_212803252_HDR.jpg

Second, I took 100' of the original 300' and suspended it in the anchor locker. There are aluminum brackets on each side used to secure the deck to the front bulkhead. You can connect a rope between these, and then suspend the extra rode (up off the anchor locker bottom) from that rope. That way it is still in play for the future. I always intended to reverse the rode when the current end that is braided to the anchor chain plays out.
 
A follow up report after a couple of months. I’ve been using the manual down instead of the free fall mode. So far it has functioned without jams or any issues. I think going with a 100’ of chain helps with that. Now that I can see how the set up lays in the locker I wish I had gone to 125’ of chain, but all good. Now that I’m used to using the windless I may turn back on the free fall mode and work with that some more. I didn’t like the delay hooking up the clutch when backing in, I just need to get used to that. Running it manually does eat battery power. I’ve attached a pic so you can see how the 100’ chain and 125’ of 8 plate lays in the locker. Hope all are having a great summer season.
 

Attachments

  • 7FA7D41D-C496-4360-9C32-BD3414E8EBF6.jpeg
    7FA7D41D-C496-4360-9C32-BD3414E8EBF6.jpeg
    1 MB
Back
Top