2120 - "Cat's Cradle"- Off Season Projects

Classic Parker Boat Forum

Help Support Classic Parker Boat Forum:

This site may earn a commission from merchant affiliate links, including eBay, Amazon, and others.
You're good to go if you filled the holes with 5200. It isolates the metals and no water can get into a void to start the corrosion process. There are other sealants/adhesives that will work as well but I like to over do it. 8)

FWIW I use black 5200 because after final install it's visible around the edges of the A/V plate where it gets wiped after it oozes after snugging up the bolts.
 
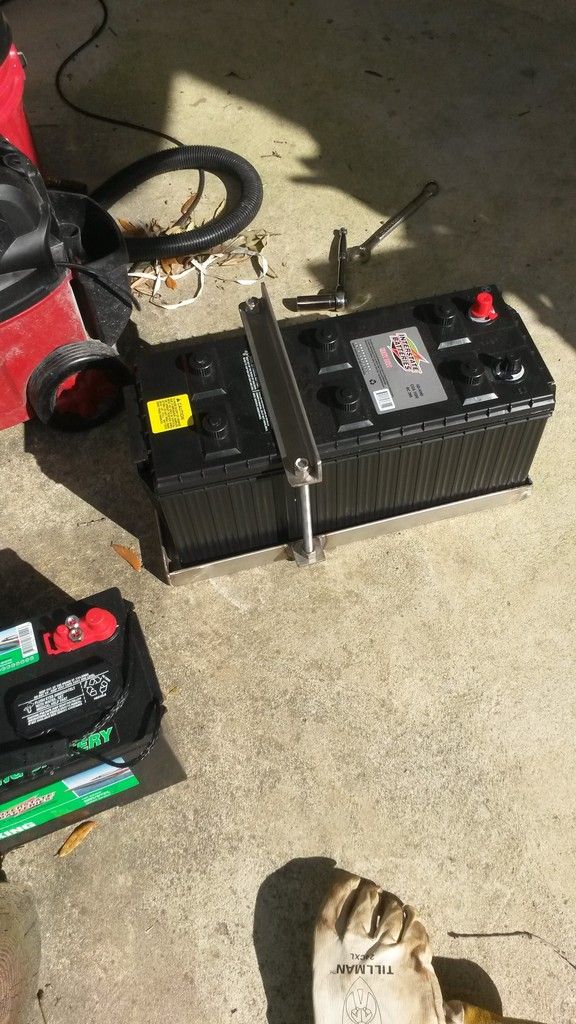
Does anyone know why they don't make a battery tray for 4D batteries? The only thing that I can find are battery boxes which I would rather not use. I can't believe that I might have to get one custom fabricated? I need a tray to mount this battery on that shelf in the bilge.
 

Attachments

  • IMG_1471.PNG
    IMG_1471.PNG
    96.5 KB
  • IMG_1470.PNG
    IMG_1470.PNG
    103 KB
As you said...... No tray for a D4...... I bought a box and then returned it. It was a joke..... The battery slid all around the inside of the box.

Then I ordered some 1/8 X 1 1/2 X 1 1/2 stainless angle and built my own.

I'd have one fabbed if you can't do it yourself.

viewtopic.php?f=11&t=12419&start=575

20160229_143834_zpsr25paimx.jpg
 
Thanks Wart. I have a friend with a welder and I deal with a lot of large trucking companies with my job and I know their maintenance people, so I guess I'll be getting something fabricated. Damn, was hoping to just purchase one. What you made is exactly what I'm looking for. Nice. Thanks!!
 
What is the value of a D4 battery in the bilge? Do you have one or two batteries there? That's a lot of weight in the bilge/ stern. What's its purpose, Dedicated house battery ?

Sorry for all the questions...just want to know WHY to learn...both of you (Shawnee and Wart) are very bright and know what you're doing on a boat...so I must be missing some form or function of this setup...
 
Sydngoose, what I'm doing is way outside of normal and I very well may regret it after I've completed the last piece of the puzzle in this project which is adding an inverter. What you haven't picked up from the earlier post is the complete project on the electrical side. Last year I added a shore power system and also a Webasto FCF 5000 BTU AC/Heat system. This year I'm in the process of adding a battery charger and an Inverter. After conferring with Wart, I included changing out the standard battery switch a BEP cluster switch for automatic battery management/charging and isolation. So the chain of logic, if you can call it that, is I wanted a battery charger because mine sits in a barn and then when I'm in Beaufort it's out all day, sometimes running all day fishing but sometimes sitting at the cape hanging out with family. Then at night it's at the Beaufort docks on shore power, many times being used as overnight lodging when it's just me and or my son and I. We are running lights radio etc and I wanted to have a charger to keep the batteries topped off and supply power at the docks on the 12V side. In addition, I have the somewhat crazy idea of being able to run my AC while underway so hence the Inverter and I need a battery charger to make this system work. With my current F225 I should be able to run the AC between 3 to 4 hrs. Looking into the future, if I ever get around to repowering with a 4.2 F300, the larger capacity charging system on the new 4.2L will allow me to run the AC somewhere around 10 hrs with this set up. As to the weight, yes it's a big concern. I had 2 wet cell batteries in each jump seat(start & house), they were 56lbs each. In the starboard jump seat I'm moving the start battery all the way forward and inboard and I changed it out to an Optima AGM that weighs 43lbs. I'm eliminating the port jump seat house battery and adding the Vmaxtanks AGM 200AH (112lbs) to the shelf in the bilge. It will be mounted all the way over on the port side, not centered, and this shelf is about 4" more forward than the position in the jump seat. The Inverter will be mounted in the Port jump seat. Keep in mind that I added about 60lbs under the helm on the starboard side with the shore power and AC system. Back to the repower option, the new 4.2 weighs about 50lbs less than my current 3.3L. It's complicated but you can see what I'm chasing on the weight and distribution. As far as bright...maybe Wart but thanks for the compliment. I think I just enjoy the challenge and like to tinker. The best way to learn is by doing and making mistakes sometimes. I hope this project isn't the latter?
 
shawnee83":2eoz3b9a said:
Sydngoose, what I'm doing is way outside of normal and I very well may regret it after I've completed the last piece of the puzzle in this project which is adding an inverter. What you haven't picked up from the earlier post is the complete project on the electrical side. Last year I added a shore power system and also a Webasto FCF 5000 BTU AC/Heat system. This year I'm in the process of adding a battery charger and an Inverter. After conferring with Wart, I included changing out the standard battery switch a BEP cluster switch for automatic battery management/charging and isolation. So the chain of logic, if you can call it that, is I wanted a battery charger because mine sits in a barn and then when I'm in Beaufort it's out all day, sometimes running all day fishing but sometimes sitting at the cape hanging out with family. Then at night it's at the Beaufort docks on shore power, many times being used as overnight lodging when it's just me and or my son and I. We are running lights radio etc and I wanted to have a charger to keep the batteries topped off and supply power at the docks on the 12V side. In addition, I have the somewhat crazy idea of being able to run my AC while underway so hence the Inverter and I need a battery charger to make this system work. With my current F225 I should be able to run the AC between 3 to 4 hrs. Looking into the future, if I ever get around to repowering with a 4.2 F300, the larger capacity charging system on the new 4.2L will allow me to run the AC somewhere around 10 hrs with this set up. As to the weight, yes it's a big concern. I had 2 wet cell batteries in each jump seat(start & house), they were 56lbs each. In the starboard jump seat I'm moving the start battery all the way forward and inboard and I changed it out to an Optima AGM that weighs 43lbs. I'm eliminating the port jump seat house battery and adding the Vmaxtanks AGM 200AH (112lbs) to the shelf in the bilge. It will be mounted all the way over on the port side, not centered, and this shelf is about 4" more forward than the position in the jump seat. The Inverter will be mounted in the Port jump seat. Keep in mind that I added about 60lbs under the helm on the starboard side with the shore power and AC system. Back to the repower option, the new 4.2 weighs about 50lbs less than my current 3.3L. It's complicated but you can see what I'm chasing on the weight and distribution. As far as bright...maybe Wart but thanks for the compliment. I think I just enjoy the challenge and like to tinker. The best way to learn is by doing and making mistakes sometimes. I hope this project isn't the latter?


Wow. Awesome explanation, and I appreciate your description. What a thoroughly thought out plan for your 2120 w the limited space you have available.

If your considering an offshore 4.2l 225, I'd ask you why not the 300 for only 7 pounds more?? That's what I was going to do with my 1st 2120. Both 70 amp output, 555 pounds vs 562 pounds weight.

See this comparison.

http://yamahaoutboards.com/outboards/V6 ... omparisons
 
Syndgoose, I did reference repowering to the 4.2 F300. I'm in total agreement with you on this. The weight on all the 4.2's are basically a wash so why not. With all of the power and torque of a 4.2 F300 on the 2120, I'm thinking you would be able to prop it so your cruise at 4200 could be pushing north of 35 mph or so? I've not run any calculations on this as I'm not there yet but that would be the concept. I feel sure the overall fuel efficiency would be better than my current F225? See pics below of a 2100 DV CC that Parker built for the NC Wildlife Service. I took this a few years ago at the Beaufort docks. I'd say that's proof of concept. 8)
 

Attachments

  • IMG_1472.JPG
    IMG_1472.JPG
    87.4 KB
  • IMG_1473.JPG
    IMG_1473.JPG
    100.1 KB
shawnee83":3d6e5pn8 said:
Syndgoose, I did reference repowering to the 4.2 F300. I'm in total agreement with you on this. The weight on all the 4.2's are basically a wash so why not. With all of the power and torque of a 4.2 F300 on the 2120, I'm thinking you would be able to prop it so your cruise at 4200 could be pushing north of 35 mph or so? I've not run any calculations on this as I'm not there yet but that would be the concept. I feel sure the overall fuel efficiency would be better than my current F225? See pics below of a 2100 DV CC that Parker built for the NC Wildlife Service. I took this a few years ago at the Beaufort docks. I'd say that's proof of concept. 8)


haha: yup: I don't know why I initially read it as the 4.2L 225 hp...yes, the 300 is a mean motor. Can't wait to see one strapped to your transom. Keep up the awesome work. Your 2120 is unlike any other out there.
 
Thanks for the compliment Sydngoose. I hope to get back to working on it today as I've not been able to get anything done for awhile. Running out of time as I promised myself that I would get it back to Beaufort by the 1st of May.
 
Sorry for all the pics of partially complete projects. I've be doing some work on the battery boxes/jump seats which has involved removing a fair amount of screws which in turn has created the need to fill a bunch of screw holes. I've also rerouted my fuel hose a little and secured it. Basically cleaning up wiring and stuff in preperation for moving the start battery and installing the BEP Cluster switch. This also caused the need to move the house breaker to the other side of the battery switch from where it was previously etc.... I will gel coat over all the repaired holes etc and I might try my hand at spraying the gel coat. I want the little compartments to look as good as new or better when I'm done. In an effort to reduce the number of batches of resun I need to mix I've overlapped fixing the crack on the transum by the motor with filling screw holes. As I mentioned at the beginning of this project, like several of my fellow 2120 owners, I have a crack on the top edge of the notch around the motor on the transum. I may not be fixing it the absolute correct way, but time will tell I guess? I ground out the crack with my Dremel. I went down as far as where the lip sticks up from the rest of the notch, which is to say close to 1/2". I kept grinding it out hoping to find the bottom of the crack and where it stopped. By the time I got down 1/2", I decided I had gone far enough? I was really surprised and disappointed to see how bad this crack was and how deep it goes. I mixed up some Polyester Resin and added the hardener then poured a little into the crack in an effort to get the unthickened resin down into that crack. I quickly mixed in some Cabosil and thickened it up to about the consistency of honey. Then I filled the rest of the crack along with all of the screw holes I had in both jump seats and in the bilge. Next step will be gel coating everything then sanding. Lastly, I'll finally start putting stuff back together and adding all the new stuff (battery charger, BEP Cluster etc...).
 

Attachments

  • IMG_1489.JPG
    IMG_1489.JPG
    96 KB
  • IMG_1490.JPG
    IMG_1490.JPG
    106.8 KB
  • IMG_1491.JPG
    IMG_1491.JPG
    76.7 KB
  • IMG_1492.JPG
    IMG_1492.JPG
    74.3 KB
  • IMG_1493.JPG
    IMG_1493.JPG
    75 KB
Just a few more pics and an update. I'm still not very comfortable doing gel coat repairs but like everything else you do, I feel a little better about it every time I do it again. A few pics after gel was applied and then after rough and then wet sand was done. Still need to compound out to finish. Right side transum pic is from my tow safety strap coming loose on last years return trip to Beaufort. The top with the ratchet just swung in an arc and beat the crap out of the gel. At least it didn't get into my graphics, lol. Still have a few gel spots to do in one jump seat and in the bilge. I'll post when done.
 

Attachments

  • IMG_1522.JPG
    IMG_1522.JPG
    92.4 KB
  • IMG_1523.JPG
    IMG_1523.JPG
    58.4 KB
  • IMG_1524.JPG
    IMG_1524.JPG
    92.3 KB
  • IMG_1525.JPG
    IMG_1525.JPG
    95.8 KB
  • IMG_1526.JPG
    IMG_1526.JPG
    40.9 KB
  • IMG_1527.JPG
    IMG_1527.JPG
    74.3 KB
Long time with no update as my procrastination and busy work schedule have delayed my progress on these projects. As with any of my list, some are complete and some will wait until another day. Delayed are my waxing (hopefully only a few days) and the nonskid on the deck will be next year. I'm at the Beaufort docks tonight having a strong drink after a hectic few days to bring my boat home to Beaufort. Working in the bilge and the battery boxes have been no fun and my cuts and scratches on my hands are evidence. The charger is up and running and the new battery switch is functioning as it should (Thanks Wart for that recommendation). Some of the battery leads you seee in the bilge not hocked up are the ones for the inverter. I have pre wired for it including at the electric panel. I ended up putting a nice new Blue Sea Systems Neg Bus in the bilge that can handle up to 250 amps for all grounding from the charger, inverter and house battery along with several other items. This really help clean up the 5 ground wires I originally had at my start battery. Now it has 3, cabin bus, engine neg and the bus in the bilge. Happy with how these projects have turned out and I learned a lot in the process. I made some mistakes too. Goes with the territory. I hope everyone has a great season. :D
 

Attachments

  • IMG_6737.JPG
    IMG_6737.JPG
    78.7 KB
  • IMG_6733.JPG
    IMG_6733.JPG
    94.3 KB
  • IMG_6732.JPG
    IMG_6732.JPG
    108.1 KB
  • IMG_6741.JPG
    IMG_6741.JPG
    105.7 KB
  • IMG_6746.JPG
    IMG_6746.JPG
    100.2 KB
Couple more of speaker mounting. Not a big deal but I do like how you can't see them unless you look under the gun gunwale.
 

Attachments

  • IMG_6760.JPG
    IMG_6760.JPG
    77.7 KB
  • IMG_6761.JPG
    IMG_6761.JPG
    57.3 KB
Back
Top